Between this post and the one before it, I had our Free-mo modules set up in the "Room to Nowhere", or what has become known as 'The Man Cave" in our home. This is because not only does this long, narrow space house my workbench and trains, it also houses our old TV and video game systems, along with a VCR for watching all my old Pentrex VHS tapes. With the modules packed up for the show that weekend, I was able to take a step back and see the blank canvas of the long wall, filling it mentally with all of the ideas I had gathered over the years. The room is only a little more than 7' wide, but is about 17' long, has screened sliding glass doors at each end, with the garage right next door. Plenty of natural light flows in from the backyard, as do the breezes of the day when the weather is right, and a small portable heater warms the room up during the winter in just a few minutes.
 |
| The blank canvas! |
1. They install very quickly.
2. They can easily be re-used and re-configured.
3. They provide a ton of flexibility.
4. Did I mention they install very easily?
To start, I knew that I wanted the rails high off the floor, so it made sense to work from the top of the room down using the 48" shelf standards ( the notched strips that hold the brackets ). I used a laser level to shoot a line down the wall which was at one point long ago the outside wall of the garage. This laser line, where it intersected a stud, represented the location where I would place one of the mounting holes on the standards. It is important to reference the mounting holes on the standards as they are the most reliable and easy to use.
 |
| So easy, even a teenager can install them! |
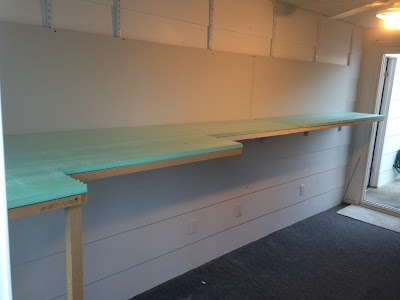
With the standards mounted and the brackets installed, I then used a pair of hollow core doors for the main benchwork. These were in the clearance bin at the local big-box store because they were damaged, so the pair cost me about $25. I screwed them to the bracket through the hole on the bottom of the bracket.
 |
| 18" wide doors are a perfect fit on the brackets. |
My sons and I decided that since one end of the layout terminated at the non-sliding portion of the door, we should add a little bump-out to that end. Plus, this provides the necessary storage for my Free-Mo modules underneath the layout! I already had a pair of 12" bifold doors on hand, so one of those was used along with some leftover 2 x 2 Free-mo legs used to create a little additional real estate.
 |
| Note the addition of the leg at the end, to allow for a small amount of staging. |
Before the evening concluded, I also installed a 24" tall run of 1/4" drywall for the backdrop. As you can see, this leaves a lot of unobstructed space under the layout for storage. In my case, my wife's scrapbooking supplies are kept here in addition to my model trains. Negotiation is key to happy time with the layout.
 |
| Ready for some tracks! |
 |
| Ready for some tracks! |
I'll post more in the very near future to bring the blog up to speed. This is going to be a lot of fun to build, so check back often!
