Wednesday, February 15, 2017

The layout begins....AGAIN!

Back in early November, my sons and I were at the Syracuse Train Fair as part of our annual Free-mo layout.  With great friends from across the country in attendance this show has become a tradition, typically marking the official "start to the model railroading season".  This time was different though as my boys were taking a genuine interest in operating trains, enough that they both told me how much they'd like to get a layout going again.  No need to tell me twice!

Between this post and the one before it, I had our Free-mo modules set up in the "Room to Nowhere", or what has become known as 'The Man Cave" in our home.  This is because not only does this long, narrow space house my workbench and trains, it also houses our old TV and video game systems, along with a VCR for watching all my old Pentrex VHS tapes.  With the modules packed up for the show that weekend, I was able to take a step back and see the blank canvas of the long wall, filling it mentally with all of the ideas I had gathered over the years.  The room is only a little more than 7' wide, but is about 17' long, has screened sliding glass doors at each end, with the garage right next door.  Plenty of natural light flows in from the backyard, as do the breezes of the day when the weather is right, and a small portable heater warms the room up during the winter in just a few minutes.

The blank canvas!

After collecting info for a couple of years on the best way to construct the layout, I decided to go with shelf brackets.  These are great for a number of reasons:

1.  They install very quickly.
2.  They can easily be re-used and re-configured.
3.  They provide a ton of flexibility.
4.  Did I mention they install very easily?

To start, I knew that I wanted the rails high off the floor, so it made sense to work from the top of the room down using the 48" shelf standards ( the notched strips that hold the brackets ).  I used a laser level to shoot a line down the wall which was at one point long ago the outside wall of the garage.  This laser line, where it intersected a stud, represented the location where I would place one of the mounting holes on the standards.  It is important to reference the mounting holes on the standards as they are the most reliable and easy to use.

So easy, even a teenager can install them!

With the standards mounted and the brackets installed, I then used a pair of hollow core doors for the main benchwork.  These were in the clearance bin at the local big-box store because they were damaged, so the pair cost me about $25.  I screwed them to the bracket through the hole on the bottom of the bracket.

18" wide doors are a perfect fit on the brackets.


My sons and I decided that since one end of the layout terminated at the non-sliding portion of the door, we should add a little bump-out to that end.  Plus, this provides the necessary storage for my Free-Mo modules underneath the layout!  I already had a pair of 12" bifold doors on hand, so one of those was used along with some leftover 2 x 2 Free-mo legs used to create a little additional real estate.

Note the addition of the leg at the end, to allow for a small amount of staging.

To finish off the benchwork, I used Liquid Nails to adhere a layer of 2" rigid foam insulation to the top of the whole thing.  Start to finish, bare-wall to layout platform, this process took only a couple of hours.

Before the evening concluded, I also installed a 24" tall run of 1/4" drywall for the backdrop.  As you can see, this leaves a lot of unobstructed space under the layout for storage.  In my case, my wife's scrapbooking supplies are kept here in addition to my model trains.  Negotiation is key to happy time with the layout.  
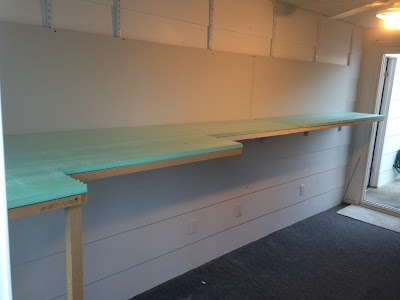

Ready for some tracks!


Ready for some tracks!


I'll post more in the very near future to bring the blog up to speed.  This is going to be a lot of fun to build, so check back often!


Thursday, January 2, 2014

New Year, New House, New Ideas

Hard to believe, but its been an entire year ( almost ) since the last post.  In case there's anyone out there reading this, here's what has happened in a nutshell:

Kids, life, work, and all the projects that come with it took over for many months.  Mid-summer, the decision was made to move across town, resulting in the layout being demolished.   We are moved in to the new house, and as the unpacking continues, so does the inspiration for the new layout.

My wife was poking fun at me New Year's Eve, telling friends that in every place we've lived together, there's been some attempt at a model train layout.  Whether a shelf mounted to the wall with some primitive, toy-like scenery in our first apartment together ( which was coincidentally 50 feet from the D&H main in Plattsburgh, NY! ) or the most recent, in our first house together, they all help me to learn  and grow in the hobby.  Of course, none of these layouts have ever been finished.  But I attribute this to the fact that they weren't really well-designed, even the STRR in its most recent form.  Bad benchwork, wiring, and track planning are one thing, however the space itself can be another issue that gets overlooked until that day when you're trying to operate with friends and you discover that the lighting is poor, there's no space, the floor is un-level, and you can't really run around your train.

This time around, its going to be different.  No really, it is.  When we bought our house, we knew we had whats affectionally become known as "the room to nowhere" - a space between the garage and the house where the prior owners had a hot tub.  The room isn't that big, only 7' - 6" x 16', with insulated sliding glass doors at both ends.  My wife suggested the space for a train room drink the first walk-through of the house, but I dismissed it thinking it would be too cold, too damp, etc.  As we've settled into though, its become evident that it is nearly perfect.  Here's why:

- Narrow dimension forces the layout to be shelf-style, lowering cost and simplifying construction
- The room, while not directly heated, stays plenty warm even during the cold winter.  A small space heater will be all thats needed to boost the temp by a few degrees while occupied, not much different than a basement layout.
- The sliding glass doors provide abundant natural light, and screens for plenty of fresh air.
- As a ground-level space, outdoor access for any quick painting or dullcote work is just steps away.
- There's plenty of power, through an isolated circuit from the hot tub.
- There's a ceiling fan in place already - I can keep it, or install a better ceiling light fixture if needed.
- The garage is a few steps around the corner, keeping carpentry work close by.
- The space is separated from the house such that guests won't be disturbing anyone inside.
- There's a refrigerator in the garage for refreshments during operating sessions.

A little sprucing up and its go-time.

So this is where it all begins.  Again.  And hopefully I can manage time, energy, and resources such that this will be a forward-moving and enjoyable process.  I'll do my best to keep things posted.  Until then, Happy New Year!


Wednesday, March 14, 2012

Time flies.....

Wow - Holidays have come and gone, and admittedly very little progress has been made on the layout.  Here we are in the midst of the warmest winter I can remember, heading into an early lacrosse season.  That means time for model trains might be minimal at best!  

When I can't get an ample amount of time at the workbench, like many people, I explore the internet on my lunch at work, or in the evenings when I am too tired to lift a finger.  If you want to see some of the best modeling out there, as well as thoughts and theories on operations, check out Lance Mindheim's blog and see what he's been up to.

Once you've had your dose of layouts and operations, stop on by The Weathering Shop and see what the crew there has been crafting.  The level of detail in weathering is second to none, and far beyond what you'll see on certain Youtube channels. 

There's tons more out there, as blogging and model railroading continue to cross paths.  For now, though, enjoy this gem, a Rail Yard Models X79 boxcar.  Rail Yard Models announced March 1st that they would be ceasing production of their prized kits, so pick one up if you can.  It is doubtful that you'll ever find another kit crafted and researched as well as these.

CR 281358 rests while being switched near Geneva, NY
Make some time for your trains once the kids are in bed and the wife is reading or watching the tube.  They miss you.

Wednesday, October 12, 2011

How do you choose what to model?

This is a common question modelers ask themselves.  It can be quite a conundrum, one that can be wrestled with for days, weeks, sometimes years before starting out down a given path.  There's no right or wrong answer, no good or bad - it is a matter of preference and personal interest, plain and simple.  I have a good friend that has been trying to sort out an era to model, along with a layout type, for over a year now, and he's no closer to figuring it out than he was at the start.  So how DO you figure it out?  I think there's a number of factors that you have to consider, starting with conversations about the layout. 

1.  How much space do you have to use for your layout?  Do you have an entire basement or attic, which lends itself to a large mainline style operation, or a spare bedroom suited to a switching layout?  Sure, some of the track-planning special issues out there would lead you to believe that you can stuff an entire mountainous coal branch in a 10 x 10 room, and you probably can - if you don't want to be able to stand next to someone!

2.  How much time do you have to put toward the layout?  If you're retired, then great - you might be blessed with a lot of free time.  If you have a wife & kids though, don't count on being able to work on the layout for more than a few short hours a week.

3.   How much money can you put toward the layout?  Pretty self-explanatory; room prep ( lighting, paint, heat, wiring, finishes ) alone can set you back a pretty penny before the first piece of benchwork is cut.  Smaller layout = smaller budget.

As Murphy's law of model railroading will tell you though, you can never have enough space, time, and money all at once.  There's a compromise in there somewhere though - for me it was a 10 x 10 room off the back of our house that needed some paint and lighting work.  It works for me, my family, the house, and my budget. If you don't even have a room, then think about a Free-Mo module, or a diorama.  They both get you into the groove of building something and don't take up much space at all.   

So now that you know a direction for your layout ( if you're building one ) sort out the railroad you want to model.  For most people this is the easiest question to answer.  Perhaps you grew up by the tracks of a certain railroad, or saw photos in magazines that have inspired you.  Keep in mind the availability of models and your abilities as a modeler while making this decision.  For example, if you're thinking of modeling an obscure shortline, then you should also be sure you're either capable of custom painting your own locomotives & rolling stock, or willing to pay someone else to do it for you!  Once you know the railroad(s) you want to model, you can establish the era for your efforts.  You'll want to consider model availability, accessibility of information ( if you're going with a prototype ) including reference photographs, and frankly what will provide the most enjoyable experience for you throughout the process.  After all, if it isn't fun, then it isn't really a hobby. 

Do you want to model history?  If so, how far back does your chosen railroad go, and what time period sparks the greatest interest for you?  For me, this was right around 1980 - Conrail was only 4 years old, there's still plenty of predecessor paint schemes untouched, LOTS of weathering opportunities, and there's a certain grit and grime to that era in most of the photos I have referenced.

Or....

Do you want to model "today"?  A lot of folks go this way, but few excel at the concept like Eric Brooman's "Utah Belt", where locomotives, rolling stock, signalling, etc all are maintained as if it were TODAY, every day, right down to the retirement of equipment, just like a real class one line.

Taking all these questions into consideration, there is yet another option, that of "Protolancing".  Tony Koester has discussed this in his books, the modeling of a plausible scenario, using realistic paint schemes, operating methods, and appropriate equipment.  This theory is what allows me to operate D&H equipment side by side in Geneva NY, over a hundred miles from the nearest D&H tracks!  It never hurts to make up the story of your railroad as a part of this process, and writing it out is a great way to shake out the particulars of your protolanced operations.

Seems like a lot of work to go through just to build a model railroad, doesn't it?  For some, this process takes minutes, for some it will take much longer.  At the end of the day it comes down to how realistic you want your layout and modeling efforts to be.  I encourage you to think through each decision carefully, utilizing your resources of time, money, and space to their maximum potential.  The decisions on the particulars of the Seneca Terminal Railroad took months for me to work out, but I now have a clear vision of what this railroad will look like.    

Monday, September 19, 2011

The Caboose

Conrail 18652, former Lehigh Valley 95100, in Manchester, NY, September 2011 - Photo by Joe Nugent

The caboose has always been one of my favorite parts of railroading.  Long ago, I used to watch the trains go by my Grandparent's house in Indiana, on the street trackage of 15th Ave in New Albany.  Beyond the diesels Milwaukee Road and L&N, like every child, I waited to see the caboose at the end.  The best was sleeping over and waking up at all hours of the night to watch the flashing red beacon gently float out of sight as the train started its journey over the Ohio River.

Cabooses still play a role in prototype railroading, as well as model railroad operations no matter what the era.  While once used on all trains, the caboose is still used today as a shoving platform for a crew to act as the lookout on long reverse moves during local switching, or as a base for radio control locomotive operations.  This means that you can integrate a caboose into almost every layout.  And why wouldn't you want to?  They are a fun build, and because they varied so widely depending on the railroad, era, union requirements, and crew preferences, you can use any number of models as a starting point, or just weather one of the beautiful RTR models on the market.  

I'll post some photos and information on a recent build in a future post, but for now, I wanted to share a link to some photos that former RIT Model Railroad Club President Joe Nugent took last week.  This is one of 2 cabooses that was located for a couple of years in Manchester, NY, and recently hauled away, hopefully to a good home.  If you happen to be modeling a Lehigh Valley, Conrail, Reading, or other caboose with the Northeastern Model as the basis, these are invaluable for getting a rare look at the interior.  Enjoy!       


Wednesday, September 14, 2011

Progression

As model railroaders, we create a physical model of history, or at least how a locomotive, freight car, or caboose looked at a certain point in time.  I find it fascinating to look back at the history of a prototype and see where it has come from, which offers up the chance to build that same model as it might have looked long ago.  For instance, this caboose, long-stationed in Plattsburgh, NY:

The Bay - Where the action is.

This is Delaware & Hudson caboose number 35815. Originally, it was built in 1970 as Erie Lackawanna #C378.  Shown in March of 1976 in Marion, OH, less than a month before Conrail, it won't hold these colors for long:

Erie Lackawanna C378, from the collection of Gene Dent / fallenflags.org

Almost immediately, the shops in Oneonta patched over the EL heralds and markings, applying a quick temporary fix:

Date unknown, assumed 1976, from the D&H Virtual Museum
By 1979, it had been repainted into the D&H "Spartan Scheme", at least matching the corporate identity of the classic red caboose:

35815 in 1979, from the D&H Virtual Museum
The 35815 remained in this scheme, as best I can tell, until the D&H was absorbed into Guilford in 1984.  By then, things were pretty rough on the railroad, and the caboose ended up being damaged by fire.  This resulted in the caboose emerging from the repair shop in Guilford's orange paint, with a "G" herald to the left of the bay window.  While I can't seem to locate a photo of the caboose in that scheme ( Guilford was not well-liked by railfans ), the caboose survived those tough times. The D&H was purchased by Canadian Pacific in 1991, and by 1993, it was wearing the same scheme applied in the mid 1980's, only with the "G" patched over. Check out this photo.

Note the square of off-color paint, covering the "G". Thank God.


When I lived in Plattsburgh in 1996 - 1997, I saw this caboose ( or a close relative ) go up and down the main from the yard to the Georgia Pacific plant every day.  It looked much the same as it does now, perhaps minus the graffiti. 
Primer finally showing through after 20+ years of foot traffic

A defaced 35815 still holding onto D&H livery


Interestingly, 35815 was sitting parked in Plattsburgh recently with a GP38-2 has quite a history itself, originally built as Lehigh Valley 319 in 1972, then shipped off to D&H as 7319, then D&H 225, then 7306, and finally re-painted by CP Rail at their Ogden shops into STL&H 7306 in April of 1997. 


Resting on a weekend, basking in the sun, STL&H 7306 & D&H 35815


So even with some gaps in the history of 35815, you can still see quite a progression in age and paint.  The choice becomes at which point to model the prototype, generally dictated by the chosen modeling era.  But for those that want to show off weathering skills, maybe a touch of D&H red under that orange would be neat to see.  Nothing wrong with being able to see some of the history, as well as know about it.  

Tuesday, September 6, 2011

Taking Time

As the anniversary of 9/11 comes around, there seems to be a renewed focus on family, with stories in the news reminding us to hug our kids and tell those around you that you care for, and love them.  You'd think this all goes without saying - as a parent, we unconditionally love our children.  However, there's plenty of days that we sit back and think about the wrong things we said, maybe losing our tempers, or not spending enough time with them.  If you're like me, you also see your "Me Time" at a premium, so why not kill 2 birds with one stone?

B and I, trackside in Plattsburgh, NY Labor Day 2011

Make railfanning an adventure with your kids.  It is a great reason to get out of the house and away from the video games.  When you find a train, take the time to talk about what you're seeing, ask them what they think is in each car, and explain why you're closely scrutinizing the details of those 100 ton barber trucks.  Kids are sponges, and they soak up everything you put out - good, bad, or ugly.  They may not really care about what you're seeing, but they will appreciate that you're sharing the experience with them.  Besides, what kid ( or adult ) isn't impressed by the power of three C44-9W's?