Wednesday, October 12, 2011

How do you choose what to model?

This is a common question modelers ask themselves.  It can be quite a conundrum, one that can be wrestled with for days, weeks, sometimes years before starting out down a given path.  There's no right or wrong answer, no good or bad - it is a matter of preference and personal interest, plain and simple.  I have a good friend that has been trying to sort out an era to model, along with a layout type, for over a year now, and he's no closer to figuring it out than he was at the start.  So how DO you figure it out?  I think there's a number of factors that you have to consider, starting with conversations about the layout. 

1.  How much space do you have to use for your layout?  Do you have an entire basement or attic, which lends itself to a large mainline style operation, or a spare bedroom suited to a switching layout?  Sure, some of the track-planning special issues out there would lead you to believe that you can stuff an entire mountainous coal branch in a 10 x 10 room, and you probably can - if you don't want to be able to stand next to someone!

2.  How much time do you have to put toward the layout?  If you're retired, then great - you might be blessed with a lot of free time.  If you have a wife & kids though, don't count on being able to work on the layout for more than a few short hours a week.

3.   How much money can you put toward the layout?  Pretty self-explanatory; room prep ( lighting, paint, heat, wiring, finishes ) alone can set you back a pretty penny before the first piece of benchwork is cut.  Smaller layout = smaller budget.

As Murphy's law of model railroading will tell you though, you can never have enough space, time, and money all at once.  There's a compromise in there somewhere though - for me it was a 10 x 10 room off the back of our house that needed some paint and lighting work.  It works for me, my family, the house, and my budget. If you don't even have a room, then think about a Free-Mo module, or a diorama.  They both get you into the groove of building something and don't take up much space at all.   

So now that you know a direction for your layout ( if you're building one ) sort out the railroad you want to model.  For most people this is the easiest question to answer.  Perhaps you grew up by the tracks of a certain railroad, or saw photos in magazines that have inspired you.  Keep in mind the availability of models and your abilities as a modeler while making this decision.  For example, if you're thinking of modeling an obscure shortline, then you should also be sure you're either capable of custom painting your own locomotives & rolling stock, or willing to pay someone else to do it for you!  Once you know the railroad(s) you want to model, you can establish the era for your efforts.  You'll want to consider model availability, accessibility of information ( if you're going with a prototype ) including reference photographs, and frankly what will provide the most enjoyable experience for you throughout the process.  After all, if it isn't fun, then it isn't really a hobby. 

Do you want to model history?  If so, how far back does your chosen railroad go, and what time period sparks the greatest interest for you?  For me, this was right around 1980 - Conrail was only 4 years old, there's still plenty of predecessor paint schemes untouched, LOTS of weathering opportunities, and there's a certain grit and grime to that era in most of the photos I have referenced.

Or....

Do you want to model "today"?  A lot of folks go this way, but few excel at the concept like Eric Brooman's "Utah Belt", where locomotives, rolling stock, signalling, etc all are maintained as if it were TODAY, every day, right down to the retirement of equipment, just like a real class one line.

Taking all these questions into consideration, there is yet another option, that of "Protolancing".  Tony Koester has discussed this in his books, the modeling of a plausible scenario, using realistic paint schemes, operating methods, and appropriate equipment.  This theory is what allows me to operate D&H equipment side by side in Geneva NY, over a hundred miles from the nearest D&H tracks!  It never hurts to make up the story of your railroad as a part of this process, and writing it out is a great way to shake out the particulars of your protolanced operations.

Seems like a lot of work to go through just to build a model railroad, doesn't it?  For some, this process takes minutes, for some it will take much longer.  At the end of the day it comes down to how realistic you want your layout and modeling efforts to be.  I encourage you to think through each decision carefully, utilizing your resources of time, money, and space to their maximum potential.  The decisions on the particulars of the Seneca Terminal Railroad took months for me to work out, but I now have a clear vision of what this railroad will look like.    

Monday, September 19, 2011

The Caboose

Conrail 18652, former Lehigh Valley 95100, in Manchester, NY, September 2011 - Photo by Joe Nugent

The caboose has always been one of my favorite parts of railroading.  Long ago, I used to watch the trains go by my Grandparent's house in Indiana, on the street trackage of 15th Ave in New Albany.  Beyond the diesels Milwaukee Road and L&N, like every child, I waited to see the caboose at the end.  The best was sleeping over and waking up at all hours of the night to watch the flashing red beacon gently float out of sight as the train started its journey over the Ohio River.

Cabooses still play a role in prototype railroading, as well as model railroad operations no matter what the era.  While once used on all trains, the caboose is still used today as a shoving platform for a crew to act as the lookout on long reverse moves during local switching, or as a base for radio control locomotive operations.  This means that you can integrate a caboose into almost every layout.  And why wouldn't you want to?  They are a fun build, and because they varied so widely depending on the railroad, era, union requirements, and crew preferences, you can use any number of models as a starting point, or just weather one of the beautiful RTR models on the market.  

I'll post some photos and information on a recent build in a future post, but for now, I wanted to share a link to some photos that former RIT Model Railroad Club President Joe Nugent took last week.  This is one of 2 cabooses that was located for a couple of years in Manchester, NY, and recently hauled away, hopefully to a good home.  If you happen to be modeling a Lehigh Valley, Conrail, Reading, or other caboose with the Northeastern Model as the basis, these are invaluable for getting a rare look at the interior.  Enjoy!       


Wednesday, September 14, 2011

Progression

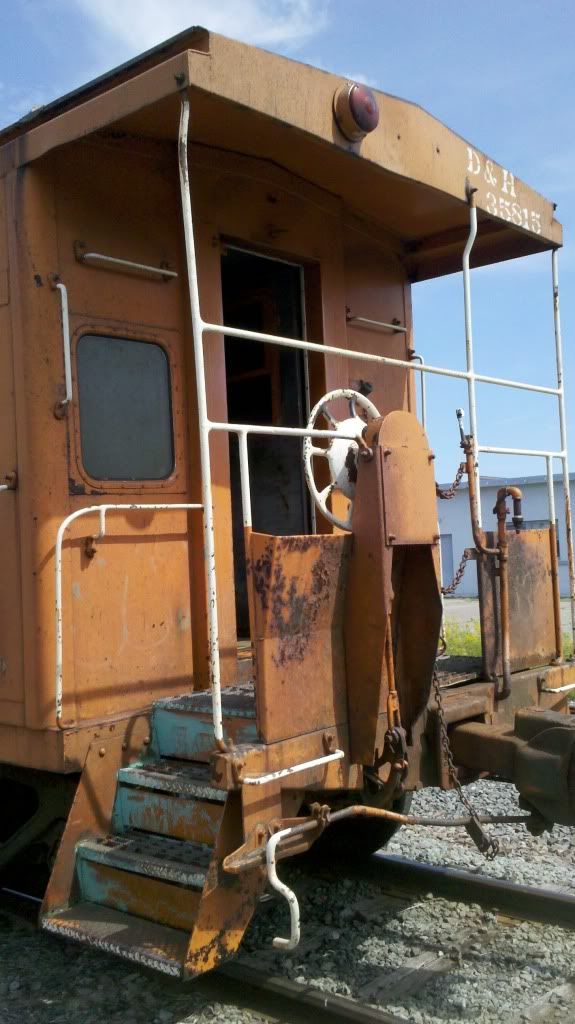
As model railroaders, we create a physical model of history, or at least how a locomotive, freight car, or caboose looked at a certain point in time.  I find it fascinating to look back at the history of a prototype and see where it has come from, which offers up the chance to build that same model as it might have looked long ago.  For instance, this caboose, long-stationed in Plattsburgh, NY:

The Bay - Where the action is.

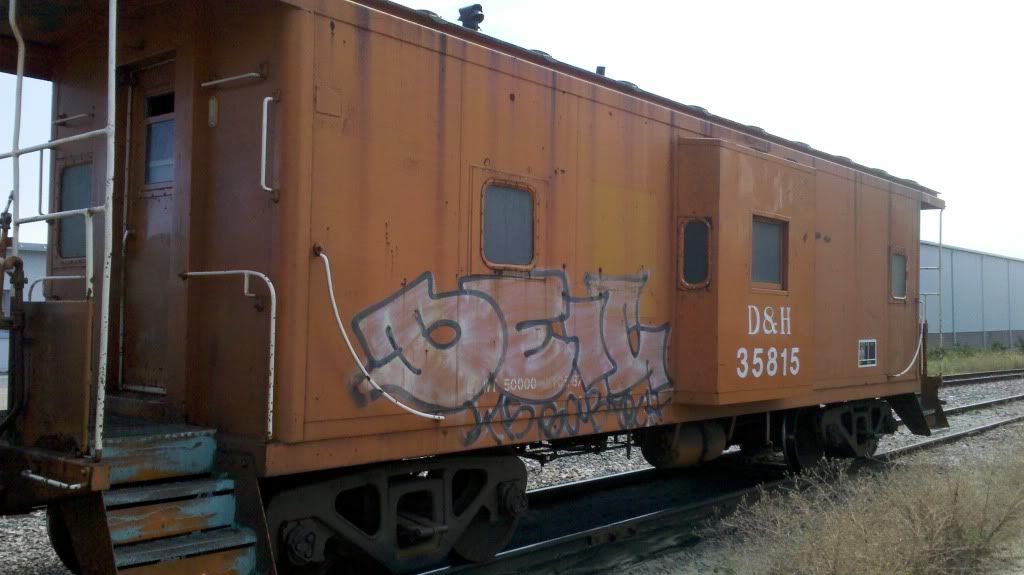
This is Delaware & Hudson caboose number 35815. Originally, it was built in 1970 as Erie Lackawanna #C378.  Shown in March of 1976 in Marion, OH, less than a month before Conrail, it won't hold these colors for long:

Erie Lackawanna C378, from the collection of Gene Dent / fallenflags.org

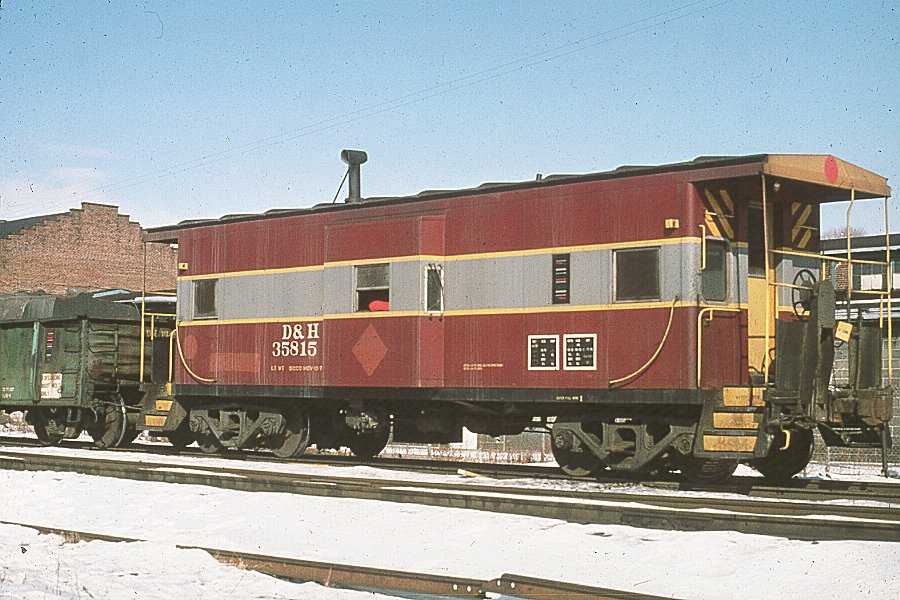
Almost immediately, the shops in Oneonta patched over the EL heralds and markings, applying a quick temporary fix:

Date unknown, assumed 1976, from the D&H Virtual Museum
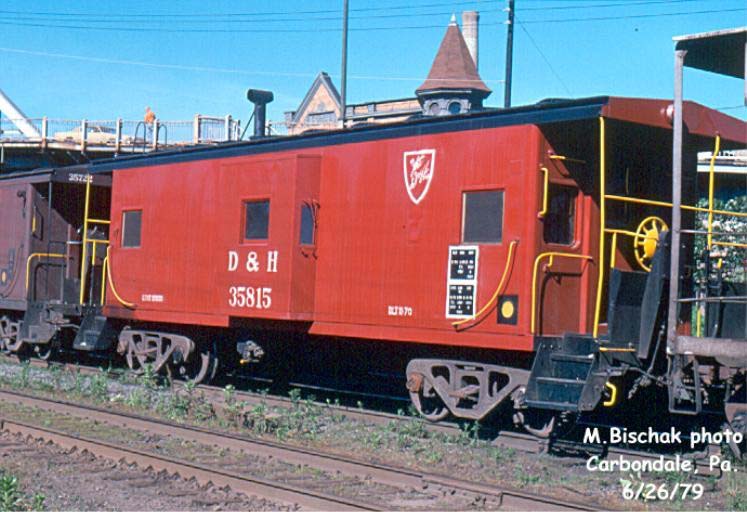
By 1979, it had been repainted into the D&H "Spartan Scheme", at least matching the corporate identity of the classic red caboose:

35815 in 1979, from the D&H Virtual Museum
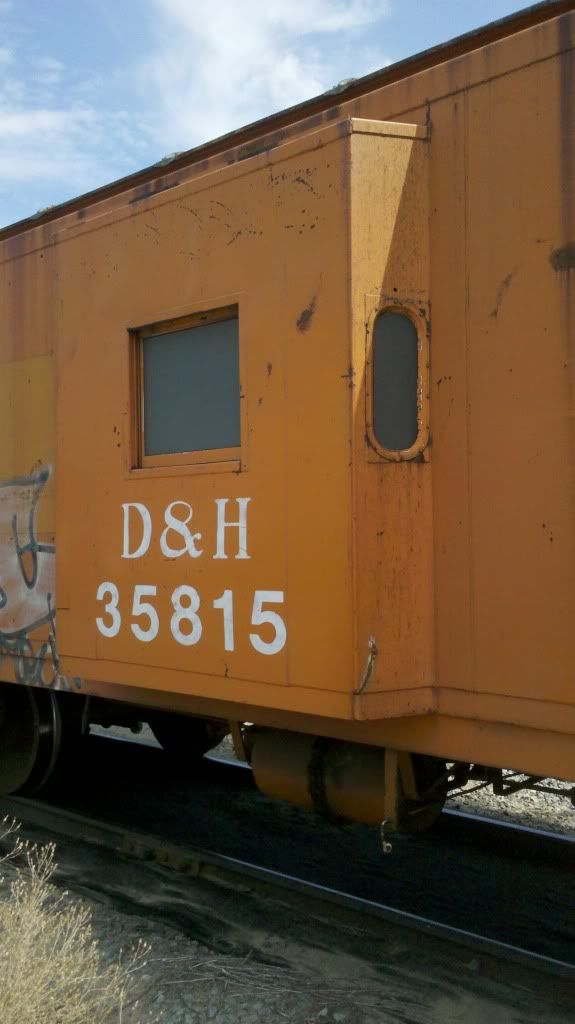
The 35815 remained in this scheme, as best I can tell, until the D&H was absorbed into Guilford in 1984.  By then, things were pretty rough on the railroad, and the caboose ended up being damaged by fire.  This resulted in the caboose emerging from the repair shop in Guilford's orange paint, with a "G" herald to the left of the bay window.  While I can't seem to locate a photo of the caboose in that scheme ( Guilford was not well-liked by railfans ), the caboose survived those tough times. The D&H was purchased by Canadian Pacific in 1991, and by 1993, it was wearing the same scheme applied in the mid 1980's, only with the "G" patched over. Check out this photo.

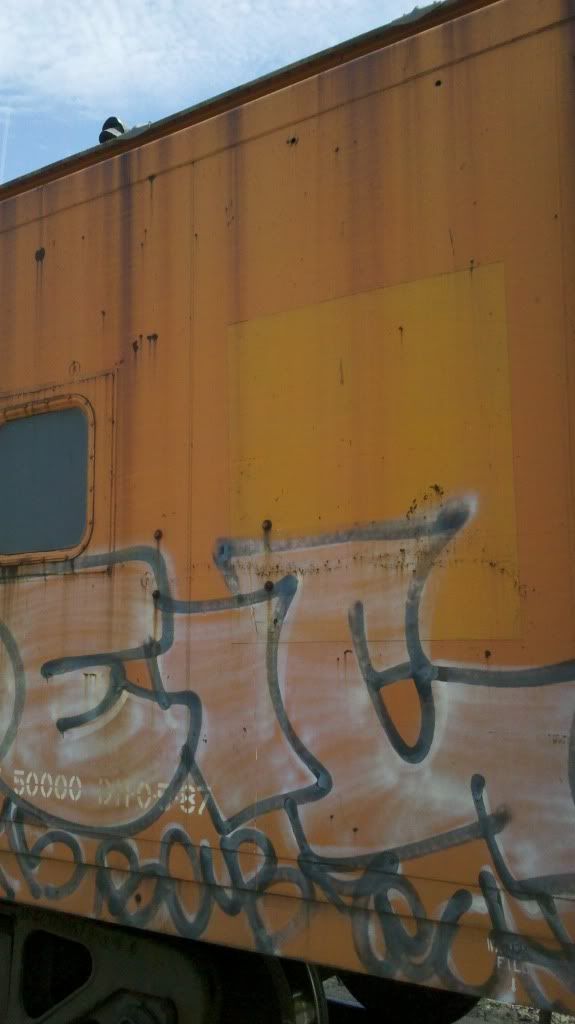
Note the square of off-color paint, covering the "G". Thank God.


When I lived in Plattsburgh in 1996 - 1997, I saw this caboose ( or a close relative ) go up and down the main from the yard to the Georgia Pacific plant every day.  It looked much the same as it does now, perhaps minus the graffiti. 
Primer finally showing through after 20+ years of foot traffic

A defaced 35815 still holding onto D&H livery


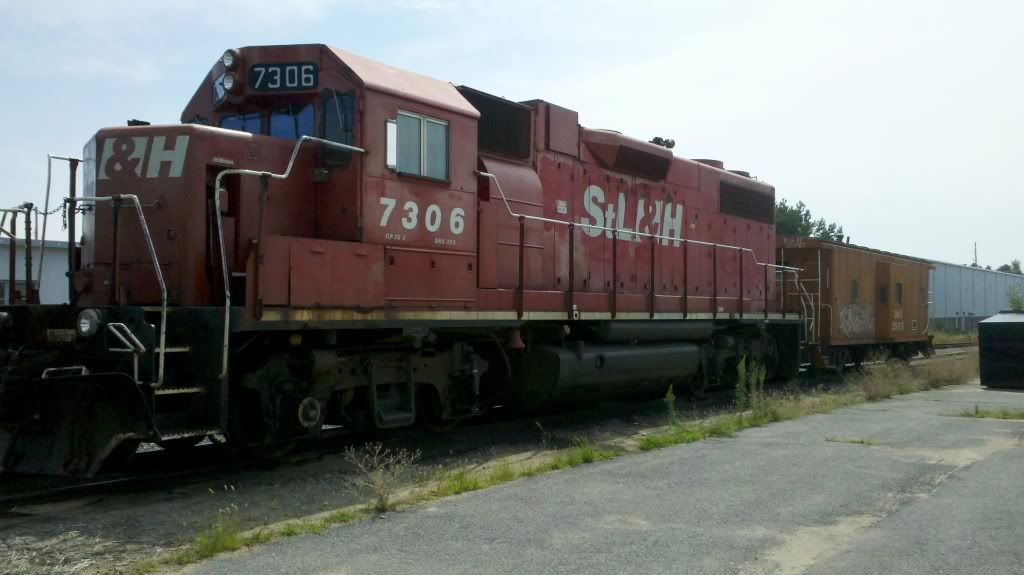
Interestingly, 35815 was sitting parked in Plattsburgh recently with a GP38-2 has quite a history itself, originally built as Lehigh Valley 319 in 1972, then shipped off to D&H as 7319, then D&H 225, then 7306, and finally re-painted by CP Rail at their Ogden shops into STL&H 7306 in April of 1997. 


Resting on a weekend, basking in the sun, STL&H 7306 & D&H 35815


So even with some gaps in the history of 35815, you can still see quite a progression in age and paint.  The choice becomes at which point to model the prototype, generally dictated by the chosen modeling era.  But for those that want to show off weathering skills, maybe a touch of D&H red under that orange would be neat to see.  Nothing wrong with being able to see some of the history, as well as know about it.  

Tuesday, September 6, 2011

Taking Time

As the anniversary of 9/11 comes around, there seems to be a renewed focus on family, with stories in the news reminding us to hug our kids and tell those around you that you care for, and love them.  You'd think this all goes without saying - as a parent, we unconditionally love our children.  However, there's plenty of days that we sit back and think about the wrong things we said, maybe losing our tempers, or not spending enough time with them.  If you're like me, you also see your "Me Time" at a premium, so why not kill 2 birds with one stone?

B and I, trackside in Plattsburgh, NY Labor Day 2011

Make railfanning an adventure with your kids.  It is a great reason to get out of the house and away from the video games.  When you find a train, take the time to talk about what you're seeing, ask them what they think is in each car, and explain why you're closely scrutinizing the details of those 100 ton barber trucks.  Kids are sponges, and they soak up everything you put out - good, bad, or ugly.  They may not really care about what you're seeing, but they will appreciate that you're sharing the experience with them.  Besides, what kid ( or adult ) isn't impressed by the power of three C44-9W's?


Wednesday, August 17, 2011

From rehash to remarkable

At some point as a model railroader, you find certain aspects of the hobby that are your area of specific interest. For some, it is operations. Others prefer building structures, and others yet enjoy DCC programming and the electronic side of things. The beauty of model railroading is that you can bounce around from project to project if you would like to, and get in a little taste of everything. This develops a highly varied skill set, and you learn far more than you would in say, knitting. Personally, I love building models - be it rolling stock or structures - from kits or scratchbuilding, so that I end up with something unique for my layout or modules. Unfortunately, too often modelers take what they can get and just use it in the form it was purchased in. This is why you see the same structures and rolling stock over and over in the pages of MR and RMC. Its called "STBS" - "Shake The Box Syndrome", where modelers just assemble whats in the box exactly as the instructions indicate. If you're happy with that, and it suits your abilities, then great - enjoy! However, there more you can do, you just have to think outside that box!

I like to revisit old projects and "spruce them up" to avoid this problem. 10 or 15 years ago, I followed those instructions to the letter and built many Walthers Cornerstone buildings. They're great kits, and when starting out they make creating a large structure far less duanting than using DPM wall sections or plaster castings. One of my earliest jobs was the good old George Roberts Printing Company. You remember this one - SO cool because it had the indoor dock for loading & unloading, despite the building not being that much longer than a boxcar anyway! Well, I assembled & painted it something like this:


When I started working on the new layout, I couldn't really find a spot for this, and I hate it when people end up designing a railroad around the footprint of their stock of assembled structures. So out came the razor saw, with the intent of making this into a background building along the yard. Essentially, I disassembled the structure at the wall joints, resulting in a series of flat panels. These were then toyed with until a suitable arrangement was found. The part of the structure that wold have been over the tracks wasn't appealing to me, with the closed sides. So I grabbed some drinking straws on a trip to the local burger joint, a couple pieces of scrap wire, and made a series of concrete columns with steel rod bracing between them.


Some styrene strips were used around the base of the overhanging floors to conceal the connection, and then I built up some blocking from styrene for the column bases. From there I popped out the windows as best I could, choosing to leave them in the molded color as they came in the kit. I grabbed an extra loading door from the scrap box, and some corrugated metal for patch work in a couple of places, which were painted before the rest of the structure, and installed later. I wanted to create a gray brick and concrete structure, so I studied a bunch of photos on line to see what sort of colors and tones were prevalent. I sprayed the newly formed structure with Rustoleum Gray Auto primer, then brush-painted Badger "Concrete" onto the pilasters and beams. With that color applied, I mixed up a few random tones of gray, brown, and white paints to highlight individual bricks here and there. This was followed by weathering with AIM powders to show some age, dust, and grime. I added some decals of graffiti and signage from my collection, though admittedly I need a new sign for the top of the building once I can dig up some old logos from the late 1970's.


I stepped back and looked at the project, thinking that it still looked like it needed some things. Then I remembered some photos I took on a visit to Amsterdam, NY where there's a treasure trove of old warehouses and factories still in use. In particular, notice the windows:


Unfortunately, I wasn't about to take the time or expense to replace the windows that came with the kit. But knowing that you wouldn't see any light through them, I cut out scraps from a black cardboard box to cover the backs of the windows. Before attaching them, I raided the kids' construction paper and grabbed some bright colors to glue in random individual panes to replicate replacement glass that had been added over the years. When BLMA released their etched metal air conditioners a while back I bought a set, and this was a perfect opportunity to use one, where the original window frame had broken. Perhaps a shift boss was getting too warm up there on the 3rd floor.

Some minor touch-up weathering work, a couple of roof vents, and fixing of scenery around the base, and we're done for now. Still some work to be done on the track and getting rid of the awful color left by some paint pens I tried. But this short project ( only took a week of evenings at the most ) renders a great structure along a wall, and it cost me absolutely nothing to create. For a sense of scale, this is where it now sits, affixed to the backdrop:


I have since done similar work with a pair of Front Street Warehouse kits, and with that project nowhere close to being finished, I'll try to post some in-progress shots along the way.

So dig through the bins of old structures and have at it. Chances are if they're sitting in a box somewhere, they're not doing you much good anyway. There's nothing to lose except for perhaps a miscut wall, and the potential of gaining a one of a kind structure for your layout.

Friday, July 29, 2011

Rolling stock, the old fashioned way

Back in the day, quite a few models were available that are rather hard to find right now. Specifically, Walthers made some great rolling stock pieces that were pretty good for their time; the PS 4427, Waffle boxcar, Jordan Spreader, are all great models if you're willing to put some TLC into them. One that I was not really aware of though was their 5-bay pressure differential covered hopper model. For its time, the tooling was exceptional, resulting in a nicely detailed model. I came across a cache of these a while back, including a pair of undecs, and picked them up for flour service on my layout. Here's one of them:


I added a Plano roofwalk, new wire grabs, air hoses, cut bars, and some extra detailing on the undercar piping, and this model looks even better.

This is my kind of project, using these older kits to create a knockout model. It often doesn't take much, even if starting with a decorated car, and it is well worth the effort when you're putting these on the same rails as newer models. After all, isn't this hobby "Model Railroading", rather than just "Model Train Collecting"?

Build something - you'll like it.

Monday, April 11, 2011

In the Beginning.....


A lonely boxcar still lettered for Penn Central is spotted at the Market Basket warehouse in Geneva.


I suppose thats how all blogs start - sort of cliche, but thats how it goes. I've been lucky enough to be a part of a couple different modular layout groups from across New York, first with NMRA-type modules, and most recently with Free-mo as the standard. While the latter has certainly provided more operational flexibility, prototypical modeling, and dedication amongst participants, there are still limitations. You can't build that awesome kitbashed warehouse thats 5 stories tall. OK, you can, but try transporting it to more than one event without having to re-assemble it. You can't have a yard with relatively tight curves. You have to be careful about placement of switches, heights of the railhead, scenery completion...the list goes on. Don't get me wrong - I love my modules, and I look forward to the one or two shows a year that bring them together with those from other fantastically gifted modelers and all around good friends from across the Northeast.

There's a room on the back of our house, one that appears to have been added on somewhere down the line, but was likely the victim of a budget-minded renovation during the depression. A couple of inches out of level, un-insulated, and in bad need of some TLC, we had used it more or less as a storeroom for toys for the kids. But as they had grown a bit, they liked playing in their rooms more, and my wife didn't like the idea of using it for a scrapbook room. You know, her feet might get cold or something. This gave me a space that was readily available, and I was certainly willing to give it a well-needed facelift. The old carpet came out, and some over-run wood flooring from Pioneer Millworks was installed. A fresh coat of paint, some crown moulding, and a couple of new outlets and it was ready to go. An oil-filled electric space heater provides necessary warmth, and the summer months allow for open windows and a nice south breeze. The only stipulation to these newly acquired trackage rights was the storage of my wife's elliptical machine, which tucks out of the way just fine.

With a blank canvas before me, as well as some 2 x 4's and 3/4" cabinet grade plywood, my good friend Andy and I got to work. We started by ripping 2 x 4's in half and placing them 2 corners of the room, and at 2' intervals in between. These provided the anchor points for the benchwork, rather than screwing into the wall and repeating that with any changes that would inevitably happen. Using plywood for the benchwork is crucial. Not only does it save a bunch of money, but it gives you a far more stable layout. In my environment, where the temperature would be changing frequently, along with humidity swings common in our area, this would make for a layout that would stand the test of time. I used similar techniques to those used when building modules. You're basically building a box, and then placing support joists at 12" intervals in between. The frames were then screwed to the 2 x 2 posts, and then angles brackets carried the load from the front of the layout down to the posts. Where the depth of the shelves were pretty narrow, 12" or so, I didn't use any other supports, just screwing the inside of the framework directly to the walls. The peninsula that came out into the middle of the room was supported on the rear by the wall-mounted benchwork, and on the end by a pair of 2 x 2 legs with angled braces.

Notice......there's been no mention of a trackplan, yet there I was framing up a layout. Huh? Well, at that time, my goal was to pack as much track as I could into this thing, and did I ever. My friend Dave and I talked about the design a lot, and I fixated on a plan that published in Model Railroader quite some time ago. It had switching, a diamond, a yard, everything I wanted. Yeah - did I mention that this room is only 9 x 10 feet? After adhering my 2" foam insulation board, I went to town getting track installed. No roadbed here, as it was going to be looking like a well-worn branchline or spur in the late 1970's.

I proudly declared trackwork complete before the snow flew, about a month after starting, and invited a couple friends over to operate on the layout. Ouch - you had to break your train in two to run around it, curves so tight that 1/2 my rolling stock didn't operate properly let alone locomotives larger than a 44 tonner, and each industry ( I think I crammed 12 of them in there ) barely had room for one car to be spotted. Sound more frustrating than enjoyable? They told me they liked it, but I knew that it needed a lot of work.

Phase two involved re-building 3/4 of the layout to make fewer industries, with longer spurs. However, there were still issues with curves being far too tight, and overall it looked like there was just too much going on. I left the layout alone for a few months, focusing on rolling stock projects, constantly bumping into the peninsula every time I was going in and out of the room. Then one day this past January, my nephew and I were staring at the layout talking about how I wanted to make it work better. Painful as it was, we removed the peninsula and the tiny wing on the West wall, breaking it down to an L-shaped layout with a overall length of a whopping 19 feet. I cleared the layout of track all the way back to the yard, which was the only thing I had been happy with all along. With a wide open room, and a much smaller area to focus on, I began looking at the work of Lance Mindheim, well-known for his modern layout depicting Miami's urban appearance perfectly. Beyond the perfect structures, creative techniques, and superb attention to detail though, there's a certain simplicity to his modeling. An 8' section of layout might only have one industry - and thats really OK!

Pondering the industries I really wanted, the timeframe I wanted to recreate, and developing the story behind the layout, the Seneca Terminal Railroad was born.